

A brass check valve is an essential component in plumbing, irrigation and industrial systems. It is designed to prevent backflow, ensuring that water, gas, or other fluids flow in only one direction. This is particularly important in water supply lines, heating systems and air compressors, where unwanted reverse flow can lead to contamination, pressure loss or even damage to pipes and equipment. Installing a brass check valve properly is crucial for ensuring optimal performance, preventing leaks and extending the life of your plumbing or mechanical system.
Brass check valves are popular due to their durability, corrosion resistance and ability to withstand high pressure and temperature variations. However, improper installation can lead to malfunction, reduced efficiency and costly repairs. This guide will walk you through the step-by-step process of installing a brass check valve, covering everything from choosing the right valve to testing the system for leaks. Whether you’re a DIY enthusiast or a professional plumber, following these guidelines will ensure a successful and leak-free installation.
Understanding Brass Check Valves
Before diving into the installation process, it is important to understand the different types of brass check valves and how they function. Knowing these details will help you select the right valve for your system and install it correctly.
Types of Brass Check Valves
- Swing Check Valve – Uses a hinged disc that swings open when fluid flows in the correct direction and closes when flow stops, preventing backflow.
- Spring-Loaded Check Valve – Contains a spring mechanism that automatically closes the valve when flow stops, ensuring a tight seal.
- Ball Check Valve – Utilizes a ball inside the valve that moves with the flow and seals against a seat when flow stops.
- Lift Check Valve – Operates using a disc that lifts when fluid flows and drops back into place when flow stops.
Each type has specific applications, so selecting the correct one depends on flow rate, pressure requirements and system design.
Tools and Materials Needed
To install a brass check valve, you will need the following tools and materials:
- Brass check valve (ensure the correct size and type for your system)
- Pipe wrench or adjustable wrench
- Teflon tape (PTFE tape) or pipe thread sealant
- Pipe cutter (if necessary)
- Deburring tool (for smoothing pipe edges)
- Measuring tape
- Threaded or soldered pipe fittings (depending on installation method)
- Flux and soldering torch (for soldered connections, if applicable)
- Plumber’s tape
Having the right tools ensures a smooth installation process and minimizes the risk of leaks.
Step-by-Step Installation Process
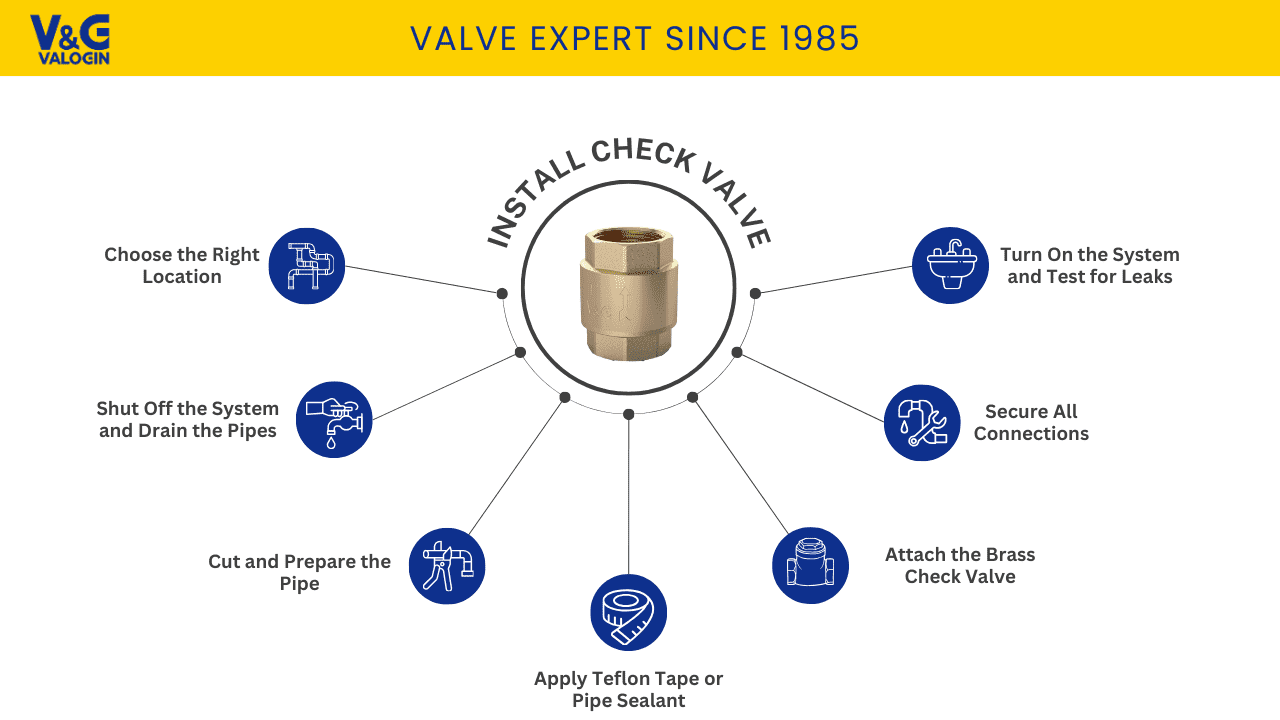
Step 1: Choose the Right Location
Install the brass check valve in a straight section of the pipeline to regulate fluid flow in one direction. This placement ensures smooth operation and prevents turbulence. Always align the flow direction arrow on the valve body with the actual fluid flow to maintain efficiency. Avoid installing the valve near elbows, bends, or other obstructions, as these can disrupt the flow and affect the valve’s performance. Ensuring a proper installation location will help maintain consistent pressure, reduce wear and extend the lifespan of the valve. Regular inspection and maintenance can further enhance its reliability.
Step 2: Shut Off the System and Drain the Pipes
Before starting the installation, turn off the water, gas or fluid supply to prevent leaks and ensure safety. Next, open a nearby faucet or valve to release any built-up pressure and drain any remaining fluid from the pipe. This step helps avoid unexpected spills and allows for a smoother installation process. Double-check that the pipeline is completely depressurized before proceeding to prevent accidents or damage to the system. Proper preparation ensures a secure and efficient installation.
Step 3: Cut and Prepare the Pipe
If installing into an existing pipeline, first mark the section where the valve will be placed. Use a pipe cutter to remove this section, ensuring the cut is clean and straight for a secure fit. A rough or uneven cut can cause leaks or improper sealing. After cutting, use a deburring tool to remove any sharp edges or burrs inside the pipe. This step is crucial, as burrs can obstruct flow and interfere with sealing, leading to potential leaks or reduced efficiency. Taking the time to properly prepare the pipe ensures a reliable and long-lasting installation.
Step 4: Apply Teflon Tape or Pipe Sealant
Before connecting the valve, prepare the pipe threads to ensure a leak-free seal. Wrap Teflon tape around the male pipe threads, making 3-5 wraps in the direction of the thread to secure a tight fit. Press the tape firmly so it molds into the threads without bunching. If using a pipe thread sealant instead, apply an even, thin layer to the threads, ensuring complete coverage. This step helps prevent leaks and enhances the durability of the connection. Avoid overapplying, as excess sealant can squeeze into the pipeline and obstruct flow.
Step 5: Attach the Brass Check Valve
Carefully thread the valve onto the prepared pipe by hand, making sure it aligns correctly with the flow direction. Turn it until snug, ensuring a proper fit before using tools. For a more secure connection, use a pipe wrench to tighten it further, but avoid over-tightening, as this can damage the valve or threads.
If using soldered connections, apply a thin layer of flux to the cleaned pipe ends. Insert the valve into place, ensuring a firm fit. Use a soldering torch to heat the joint evenly, applying solder until it flows smoothly around the connection. Allow the joint to cool naturally before handling, ensuring a strong and leak-free seal.
Step 6: Secure All Connections
Inspect all fittings carefully to ensure they are properly tightened and aligned. Check that the valve is positioned correctly according to the flow direction. Look for any gaps, misalignments or loose connections that could lead to leaks. If necessary, slightly adjust the valve or fittings to achieve a secure and stable installation. Taking this extra step helps prevent future issues and ensures reliable operation.
Step 7: Turn On the System and Test for Leaks
Gradually restore the water or gas supply while closely monitoring the valve and surrounding connections. Check for any signs of leaks, such as drips or moisture buildup. If a leak appears, slightly tighten the fittings or remove the valve, reapply Teflon tape or thread sealant and reinstall it securely. Allow the system to run for a few minutes and observe the valve’s function to confirm proper operation. Ensure there are no unusual noises, pressure fluctuations or obstructions that could indicate an issue.
Troubleshooting Common Installation Issues
If leaks occur at the threads, it may be due to a loose connection or insufficient Teflon tape. Reapply Teflon tape and tighten the fittings properly. If the valve is not opening, check whether it was installed in the wrong direction. The flow direction arrow on the valve body should always align with the intended fluid flow. If the valve produces unusual noise, it could be due to high flow velocity causing turbulence. Ensuring the valve is properly sized and positioned can help minimize noise. Reduced flow rate may indicate blockage or debris inside the valve. In this case, removing and cleaning the valve can restore proper function.
Maintenance Tips for Brass Check Valves
To ensure long-lasting performance, follow these maintenance tips:
- Inspect the valve regularly for leaks, corrosion or wear.
- Flush the system periodically to prevent debris buildup.
- Lubricate moving parts if necessary to ensure smooth operation.
- Avoid exposure to extreme temperatures to prevent damage to seals.
- Replace worn-out seals or gaskets to maintain a proper seal and prevent leaks.
Conclusion
Installing a brass check valve correctly ensures efficient flow control and system protection. Whether used in plumbing, irrigation, HVAC or industrial systems, following the proper installation steps will prevent backflow, pressure loss and potential system damage. Taking the time to properly align, seal and secure your valve will reduce the risk of leaks and malfunctions.
Furthermore, performing regular maintenance and inspections will extend the valve’s lifespan, keeping your system operating efficiently for years. Whether you’re a professional or a DIY enthusiast, a correctly installed brass check valve will provide long-term reliability and peace of mind.
By incorporating these best practices, you can ensure a leak-free, efficient and durable installation, keeping your brass check valve operating smoothly for years to come. Let me know if you need any additional guidance!

