
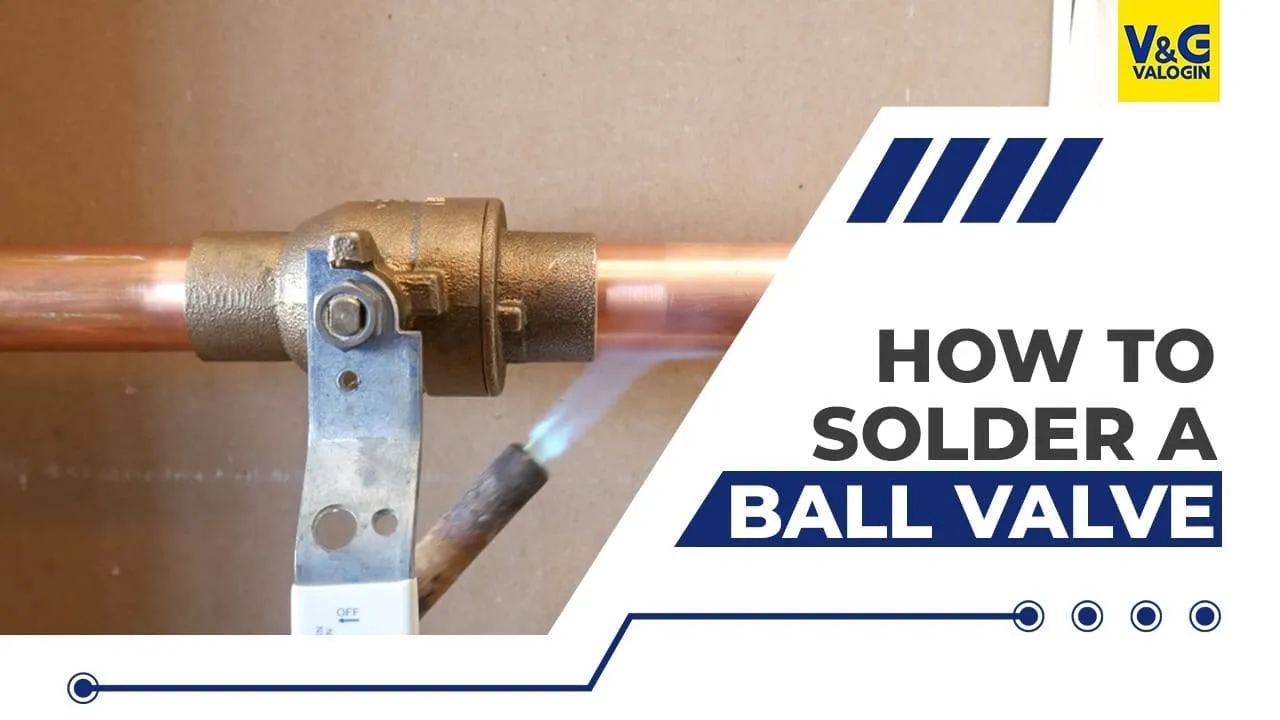
Ball valves are essential components in plumbing systems. They’re durable, reliable and provide full-flow shutoff with a simple quarter turn. But installing one the right way—especially on copper piping—requires proper soldering skills. A poor solder joint can lead to leaks, water damage and wasted time.
In this comprehensive guide, we’ll walk you through everything you need to know how to soldering a ball valve safely and correctly. Whether you’re a DIY homeowner or a beginner plumber, this step-by-step tutorial will help you get professional-grade results.
Why Soldering a Ball Valve Matters
Soldering is the process of joining two metal surfaces using a filler metal (solder) with a lower melting point. In plumbing, soldering is often referred to as “sweating” a pipe. It’s the go-to method for connecting copper pipes and fittings because it creates a permanent, watertight seal.
Ball valves are often used as shut-off points in water lines, so their connection needs to be rock-solid. A well-soldered ball valve ensures:
-
Zero leaks at the joint
-
Long-lasting durability
-
Safe and uninterrupted water flow
-
Compliance with plumbing codes
Getting it wrong, on the other hand, can result in weak joints, leaks behind walls and costly repairs.
Tools and Materials You’ll Need
Before you begin, gather all the tools and supplies to avoid scrambling mid-project. You don’t want to be holding a torch and realize you forgot the flux.
Tools:
-
Torch: A propane torch works fine for small jobs. MAP gas torches burn hotter and speed up the process.
-
Pipe cutter: For making straight, clean cuts on copper pipe.
-
Wire brush or emery cloth: Used to scrub and clean the pipe and valve ends to remove oxidation and prepare the metal for soldering.
-
Flux brush: A small applicator for spreading flux evenly.
-
Heat shield: A protective pad to shield flammable surfaces behind or near the soldering area.
-
Adjustable wrench: Optional, for fine positioning or tightening valves.
-
Safety gear: Safety glasses and gloves are a must when working with flame and molten solder.
Materials:
-
Copper pipe: The section of pipe you’re connecting the valve to.
-
Ball valve (sweat/solder type): Ensure it has sweat connections (smooth ends), not threaded ends.
-
Lead-free solder: Plumbing codes require lead-free solder for potable water lines.
-
Lead-free flux: Helps solder flow and prevents oxidation during heating.
Step-by-Step Instructions
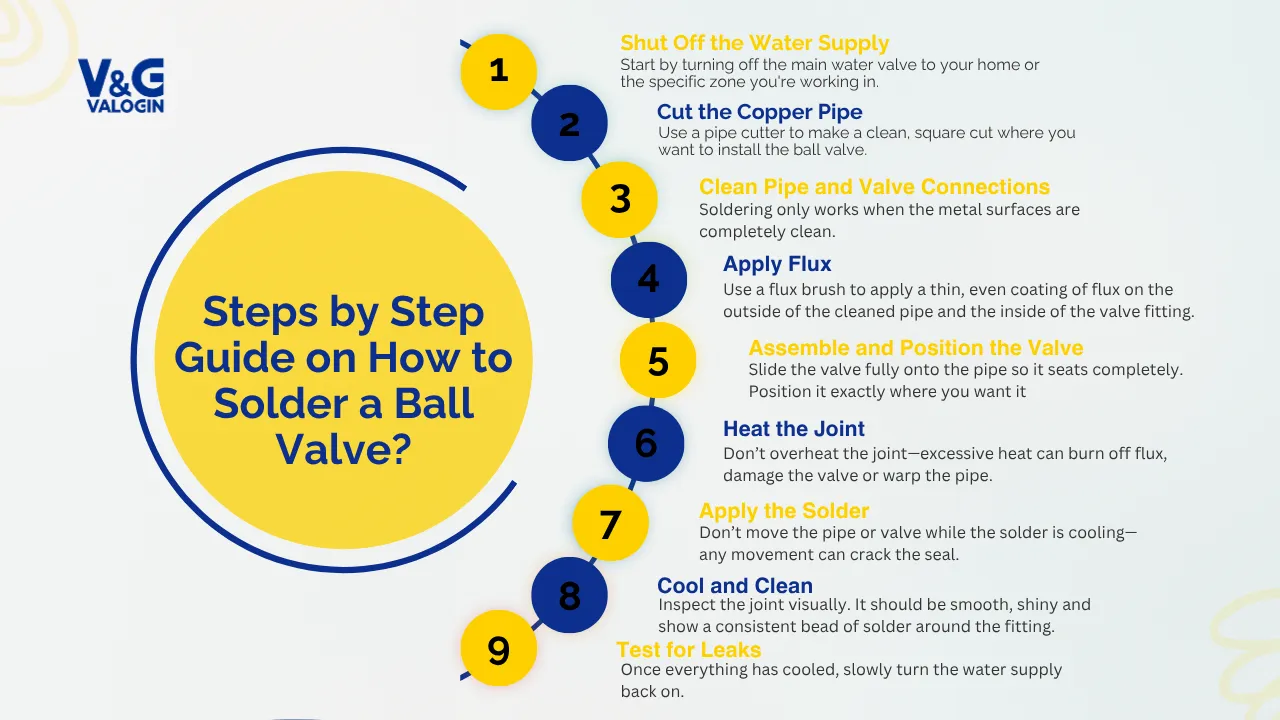
Step 1: Shut Off the Water Supply
Start by turning off the main water valve to your home or the specific zone you’re working in. Once off, open the lowest faucet in the system to drain the lines and relieve any remaining pressure.
Then, open a faucet near the work area to allow air in and help the water drain fully from the pipe. Any leftover water in the line can interfere with soldering by absorbing heat and preventing the solder from melting.
Tip: Use a wet/dry vac or compressed air to blow out lingering water if needed.
Step 2: Cut the Copper Pipe
Use a pipe cutter to make a clean, square cut where you want to install the ball valve. Rotate the cutter around the pipe, gradually tightening it until the pipe is cut all the way through.
After cutting, inspect the edge. Use a deburring tool, round file or utility knife to smooth the inside edge of the pipe. Sharp burrs can disrupt water flow and cause turbulence or corrosion over time.
Step 3: Clean Pipe and Valve Connections
Soldering only works when the metal surfaces are completely clean. Use emery cloth or a wire brush to scrub the outside of the pipe where the valve will fit. Do the same inside the valve socket. You should see bright, bare copper or brass—not dull or oxidized metal.
Dirty or oxidized joints won’t accept solder properly and can lead to leaks later on.
Reminder: Clean both the pipe and the valve—even new parts can be oxidized or oily from manufacturing.
Step 4: Apply Flux
Use a flux brush to apply a thin, even coating of flux on the outside of the cleaned pipe and the inside of the valve fitting. Don’t go overboard—excess flux can create drips or burn when heated.
Flux serves two main purposes:
-
Prevents oxidation during heating.
-
Helps the solder flow smoothly into the joint via capillary action.
Make sure to cap the flux container after use to keep it clean and avoid contamination.
Step 5: Assemble and Position the Valve
Slide the valve fully onto the pipe so it seats completely. Position it exactly where you want it—this is your last chance to align the handle direction properly.
Make sure the valve handle is in the open position while soldering. Heat can damage the internal seals if the valve is closed.
Place a heat shield behind the joint to protect nearby walls, studs or insulation from flame damage.
Step 6: Heat the Joint
Fire up your torch and begin heating the valve fitting, not the pipe. Keep the flame moving in small circles to distribute heat evenly.
As the metal heats up, the flux will start to bubble and sizzle. That’s your signal the joint is nearing the right temperature. This usually takes 10–20 seconds depending on your torch and pipe size.
Caution: Don’t overheat the joint—excessive heat can burn off flux, damage the valve or warp the pipe.
Step 7: Apply the Solder
Now, touch the tip of your solder wire to the joint—not to the flame. If the joint is hot enough, the solder will instantly melt and be drawn into the joint. This is called capillary action.
Feed the solder all the way around the joint until you see a small, even bead of solder around the entire connection. That’s your visual cue that the joint is sealed.
Don’t move the pipe or valve while the solder is cooling—any movement can crack the seal.
Step 8: Cool and Clean
Let the joint cool naturally. Don’t blow on it or spray it with water—that can weaken the bond or create tiny cracks.
Once cool to the touch, wipe the joint with a damp rag to remove any leftover flux. Dried flux can corrode the joint over time if not cleaned off.
Inspect the joint visually. It should be smooth, shiny and show a consistent bead of solder around the fitting.
Step 9: Test for Leaks
Once everything has cooled, slowly turn the water supply back on. Watch the newly soldered joint carefully for any signs of dripping or moisture.
If you spot a leak, unfortunately you’ll need to cut out the joint, clean everything and solder it again. Trying to “patch” a bad solder joint rarely works long-term.
Common Mistakes to Avoid
Here are some frequent errors that can sabotage your soldering job:
-
Not fully draining the pipe: Even a small amount of water will absorb heat and prevent solder from flowing.
-
Skipping cleaning steps: Oxidation prevents proper bonding.
-
Overheating the valve: Can damage seals or deform the fitting.
-
Using too much solder: Leads to drips or blocks the inside of the pipe.
-
Not using a heat shield: Risk of setting nearby materials on fire.
Avoid these and you’ll save yourself time and frustration.
Final Thoughts
Learning how to soldering a ball valve isn’t just a useful plumbing skill—it’s an essential one if you’re working with copper piping. With the right tools, patience and attention to detail, you can install valves that hold strong for years without a single drop of leakage.
Whether you’re remodeling, replacing old valves
Ball valves are essential components in plumbing systems. They’re durable, reliable, and provide full-flow shutoff with a simple quarter turn. But installing one the right way—especially on copper piping—requires proper soldering skills. A poor solder joint can lead to leaks, water damage, and wasted time.
In this comprehensive guide, we’ll walk you through everything you need to know to solder a ball valve safely and correctly. Whether you’re a DIY homeowner or a beginner plumber, this step-by-step tutorial will help you get professional-grade results.

